The first Infini-Z
The first printer that can build itself higher

Before the industrial revolutions, all produced items were unique, and were usually produced locally. From the industrial revolution until today, if something needed to be produced in great quantity, one would create one unified design that can be produced over and over again. This allows us to optimize the production process, and thereby cut costs considerably. To achieve even greater cost savings, products are specifically designed for very rigid production chains.
However this approach has a few downsides;
-The approach limits the design possibilities of the final product by the constraints of the production facilities.
-It is vulnerable to supply chain disruptions, only a single node needs to fail to halt the entire production.
-Product changes often require re-tooling parts of the chain, this takes time and can have significant cost associated with it.
The main advantage of 3D-printing, the neglectable cost of increasing complexity in parts, has today been underutilized
However, with the recent advent of AI, one can assume that future engineering processes will be able to leverage this new technology to not only accelerate development cycles, but to be able to create infinite versions of one product that can be tailored to any application or user.
Imagine a computer mouse that is shaped to fit exactly your hand, or a cup that is ergonomic to hold, and is able to contain the exact amount of liquid that you usually consume, no more glass half empty!
Additionally, due to the fragility of the current supply chain, it is more desirable than ever to be able to scale up local production capacity quickly. Localizing production would greatly increase the use of flexible manufacturing processes, therein also 3D-printing.
If a 3D printer is able to create 2 (more on this number later) copies of itself in 48h, then after only two weeks, one could (theoretically) have over 2000 printers available for use. After a month, over 4 million.
The one of the short term objectives of Project Quine is to be able to 3D-print a 3D-printer without using externally produced parts. This is a complex task with many challenges, and in this article we will discuss one of the most basic, but most important ones;
“How do you print a printer that is the same size (or even larger) than the original printer?”
Most current 3D-printers have a build volume that is smaller than the printer's external dimensions. Current designs of 3D-Printed frames get around this limitation by printing the frame parts in segments, then requiring assembly afterwards.
For one-offs this is not an issue, but after just a month of self replication, the workload of assembly would be immense. There is some complexity involved with getting the frame properly aligned and squared off, this can present a hindrance if one would want to assemble many, or automate the process.
Additionally there is (usually) a need for hardware or glue to assemble these frames.
Hence why we wish to create a 3D-printer, that is able to print a copy of the entire frame, where the frame is a single rigid part.
I'll forgo the reflection of "can a larger box fit into a smaller one?" and dive directly into the matter at hand:
If the printer is able to climb onto whatever it is printing, it will be able to keep printing higher and higher (think of a construction crane). So we need to design a printer that has its Z-axis-mechanism inside of the build volume, with which one can print infinitely in the Z-direction (theoretically).
If you now place the printer on its side, you will be able to print it in this printer.
In the illustration below, the red printer frame has printed both the Z-Axis extension and a copy of itself.
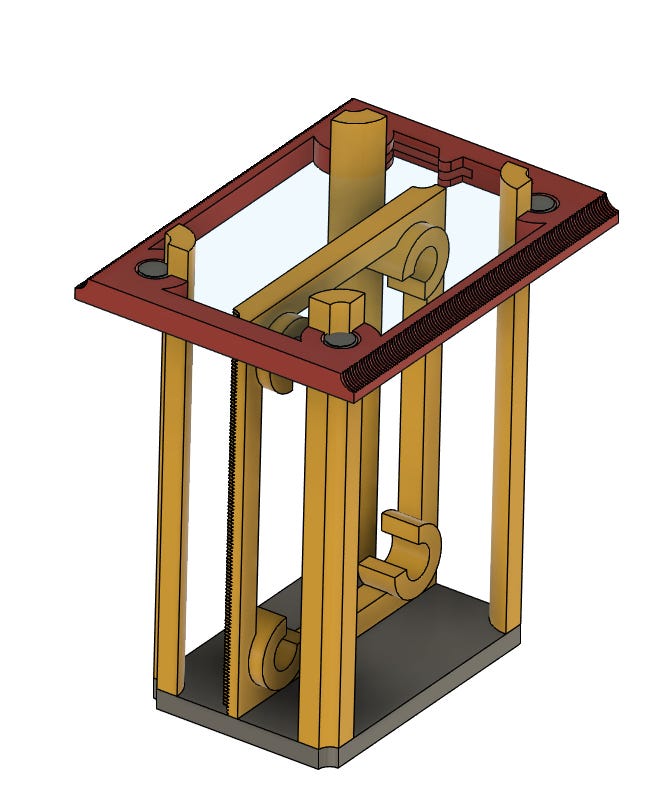
Additionally, if one would use the printer that is being printed as the Z-axis, one can greatly reduce the necessary print time if the printer will no longer be required to print tall objects after the printer has self replicated. In the illustrated setup below, a single printer (red) is printing 2 of itself (yellow and green) simultaneously, and it is using the printers as the z-axis.
To achieve this we developed the Infini-Z printer seen in the video at the top of this article.
The project had many development goals, but the main objective was to create a Z-axis mechanism that would allow the printer to function in the desired way.
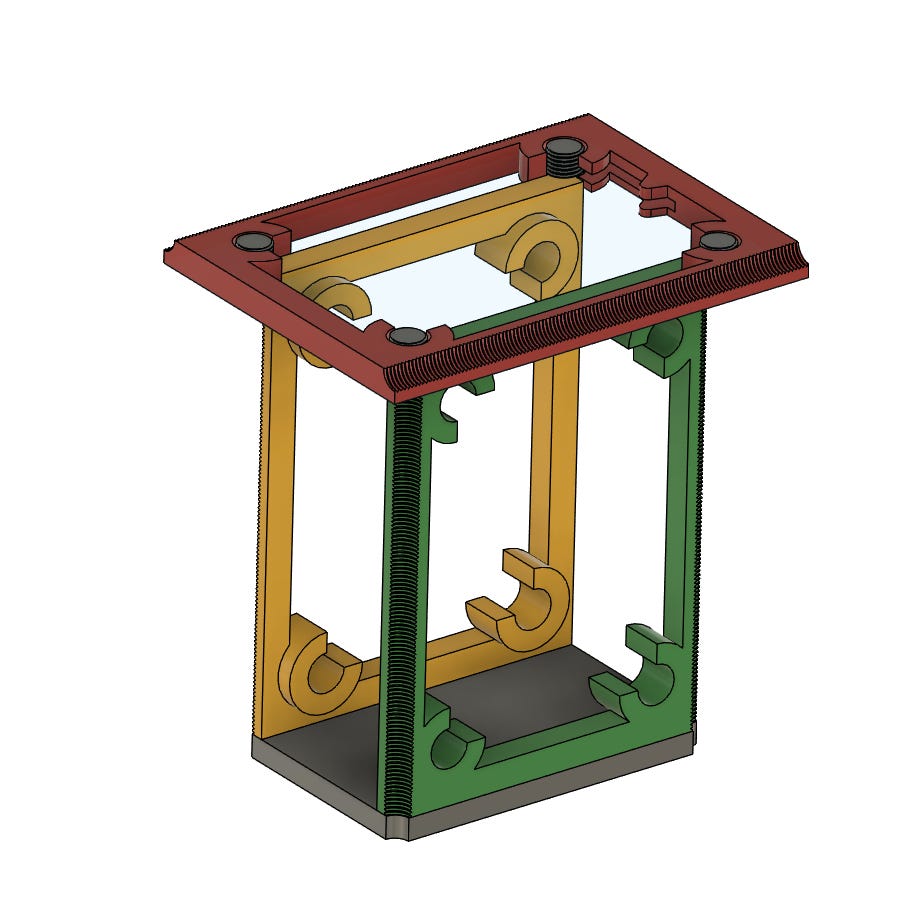
A few different mechanisms were considered, but the decision fell on using a quarter female thread on all 4 corners interacting with a rotating male thread as both the lifting mechanism, and also alignment-constraint. The main reason for using this was ease of manufacturing for a 3D-printer, and the ability to bridge between the female threads to create a stronger structure if necessary when prints get higher. See illustration below.

This would also allow for a self leveling mechanism if all 4 threads would be driven by individual steppers.
One of the main issues with this design is that traditional threads have a positive thread angle. This would usually cause a natural centering of a screw during operation. However in our case it causes a force that pushes the male and female threads away from each other. This becomes an issue already a few cm from the base of the printer, where the printer frame is a lot more rigid than the female threads that it is climbing onto, and it results in the legs being pushed out, and threads to skip:

https://twitter.com/ProjectQuine/status/1641015950798467074?s=20
While this could be resolved in the short term with a bracket as shown in the Tweet above, this causes some friction, possible jams and most importantly, it removes the ability to bridge between the legs.
The solution is to design a printable thread that has a negative thread angle: This would cause the threads to be pulled together under load and it would solve the issue we are experiencing.
After a few tests and attempts the following thread profile was developed, its both printable and it functions as desired.

https://twitter.com/ProjectQuine/status/1647927972739915776?s=20
This thread design also allows the male thread to be held on the threads without any further support!
The first printer you can see is a development in progress. Some of the initial assumptions turned out to be wrong and, due to this the printer is not able to print over all of the threads, and hence, it is not able to extend its own Z-height. However this is just a single revision away from being able to do so!
Additionally the current printer uses only 20 screws (4 of which are not necessary for the printer to function, and the next revision will use even less. This reduces assembly time and effort, but also moves towards the printer being fully printable with no externally sourced parts.
While the first revision uses some GT2-idelers, we are planning on changing all bearings to 608 bearings for the next revision to simplify the sourcing of external parts, before making these too fully printable in the future.
-SunShine
26.04.2023
Stay up to date on our newest developments by following us on our social media:
Ps. Sorry about embedding Tweets like my professor would.
Why'd you use a quarter-internal-half thread thingy with grubscrew on the Z, instead of a regular thread with a nut? Seems like 10x more complexity with a drawback of having no strength and less precision?
If you put the printhead on a pair of Servos (2 axis) so it can rotate 45-degrees in any axis - you'd be able to update this design so it can also print an infinite X and Y axis, as well as Z, and also do other useful print gymnastics (like printing on the side of things for overhangs)
Hello, I saw a video on the infini-Z 3D printer. How, or where do I get it?